In this spring rest tutorial, we will create restful web services Crud APIs by using HTTP verbs GET, POST, PUT and Delete and returning XML representations of resources. In previous post, we have created a Spring Restful web services CRUD based example which returns json. In this post, we will see same example Spring Restful web services CRUD based on which will return xml.
If you want to learn more about REST you could read my previous article What is REST? Architecture and it’s Constraints. And also I have discussed how to consume Spring RESTful web services by RestTemplate read this article.
Technologies used in this example
- Spring webmvc
- Spring Data JPA
- JAXB
- Hibernate Entity Manager
- H2 in-memory database
Let’s see steps to create a simple Spring Restful web services crud example which will return XML.
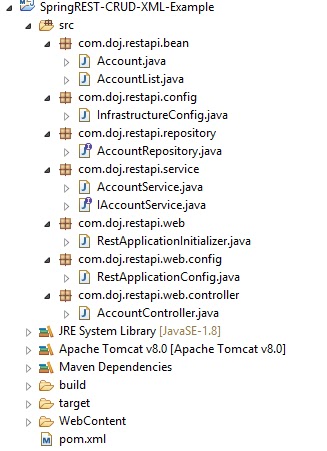
Step 1: Create a Dynamic web project using maven.
Project Structure
Download Source Code from GitHub
Spring Restful Web Services XML CRUD Example
Step 2: Maven dependency for this application.
In pom.xml, there are following dependency required for this application.
<properties>
   <spring.version>4.3.5.RELEASE</spring.version>
   <spring.data.version>1.11.1.RELEASE</spring.data.version>
   <h2.version>1.4.193</h2.version>
  </properties>

  <dependencies>
   <dependency>
     <groupId>org.springframework</groupId>
     <artifactId>spring-webmvc</artifactId>
     <version>${spring.version}</version>
 </dependency>

 <dependency>
     <groupId>org.springframework.data</groupId>
     <artifactId>spring-data-jpa</artifactId>
     <version>${spring.data.version}</version>
 </dependency>

 <dependency>
     <groupId>com.h2database</groupId>
     <artifactId>h2</artifactId>
     <version>${h2.version}</version>
 </dependency>

 <dependency>
      <groupId>org.hibernate</groupId>
      <artifactId>hibernate-entitymanager</artifactId>
      <version>5.1.0.Final</version>
 </dependency>
  </dependencies>
If you want to include JSON response support as well then you need to do is include Jackson libraries into classpath, same APIs will work for jackson as well.
<dependency>
    <groupId>com.fasterxml.jackson.core</groupId>
    <artifactId>jackson-databind</artifactId>
    <version>2.5.0</version>
</dependency>
Step 3: Creating Spring Configuration files for this application
Here we are using Java based configuration. So let’s see following configuration java classes for this example.
a) Spring Configuration class for Spring MVC
RestApplicationConfig.java
/**
 *
 */
package com.doj.restapi.web.config;

import org.springframework.context.annotation.ComponentScan;
import org.springframework.context.annotation.Configuration;
import org.springframework.web.servlet.config.annotation.EnableWebMvc;

/**
 * @author Dinesh.Rajput
 *
 */
@Configuration
@EnableWebMvc
@ComponentScan("com.doj.restapi.web.controller")
public class RestApplicationConfig{

}
b) Spring Configuration for application Infrastructure
This file has configuration about application core services like DB connection, DataSource and also scan the packages for service classes and repositories i.e. Non web components.
InfrastructureConfig.java
/**
 *
 */
package com.doj.restapi.config;

import javax.persistence.EntityManagerFactory;
import javax.sql.DataSource;

import org.springframework.context.annotation.Bean;
import org.springframework.context.annotation.ComponentScan;
import org.springframework.context.annotation.Configuration;
import org.springframework.data.jpa.repository.config.EnableJpaRepositories;
import org.springframework.jdbc.datasource.embedded.EmbeddedDatabaseBuilder;
import org.springframework.jdbc.datasource.embedded.EmbeddedDatabaseType;
import org.springframework.orm.jpa.JpaTransactionManager;
import org.springframework.orm.jpa.JpaVendorAdapter;
import org.springframework.orm.jpa.LocalContainerEntityManagerFactoryBean;
import org.springframework.orm.jpa.vendor.Database;
import org.springframework.orm.jpa.vendor.HibernateJpaVendorAdapter;

/**
 * @author Dinesh.Rajput
 *
 */
@Configuration
@ComponentScan("com.doj.restapi.service")
@EnableJpaRepositories("com.doj.restapi.repository")
public class InfrastructureConfig {

 @Bean
 public DataSource dataSource() {
  return new EmbeddedDatabaseBuilder().setType(EmbeddedDatabaseType.H2).build();
 }

 @Bean
 public JpaVendorAdapter jpaVendorAdapter() {
  HibernateJpaVendorAdapter bean = new HibernateJpaVendorAdapter();
  bean.setDatabase(Database.H2);
  bean.setGenerateDdl(true);
  return bean;
 }

 @Bean
 public LocalContainerEntityManagerFactoryBean entityManagerFactory(
   DataSource dataSource, JpaVendorAdapter jpaVendorAdapter) {
  LocalContainerEntityManagerFactoryBean bean = new LocalContainerEntityManagerFactoryBean();
  bean.setDataSource(dataSource);
  bean.setJpaVendorAdapter(jpaVendorAdapter);
  bean.setPackagesToScan("com.doj.restapi.bean");
  return bean;
 }

 @Bean
 public JpaTransactionManager transactionManager(EntityManagerFactory emf) {
  return new JpaTransactionManager(emf);
 }
}
Step 4: Creating Web Application Initializer file for this application
In this example we are using Java Based web application configuration instead of traditional web.xml file and for this we have required at least tomcat 7 and servlet 3.0+ .
RestApplicationInitializer.java
/**
 *
 */
package com.doj.restapi.web;

import org.springframework.web.servlet.support.AbstractAnnotationConfigDispatcherServletInitializer;

import com.doj.restapi.config.InfrastructureConfig;
import com.doj.restapi.web.config.RestApplicationConfig;

/**
 * @author Dinesh.Rajput
 *
 */
public class RestApplicationInitializer extends AbstractAnnotationConfigDispatcherServletInitializer {

 @Override
 protected Class<?>[] getRootConfigClasses() {
  return new Class[] { InfrastructureConfig.class };
 }

 @Override
 protected Class<?>[] getServletConfigClasses() {
  return new Class[] { RestApplicationConfig.class };
 }

 @Override
 protected String[] getServletMappings() {
  return new String[] { "/" };
 }
}
Step 5: Creating Application classes
In this application, we will create and read account resource from account repository.
a) Create a Controller AccountController.java
/**
 *
 */
package com.doj.restapi.web.controller;

import org.springframework.beans.factory.annotation.Autowired;
import org.springframework.web.bind.annotation.DeleteMapping;
import org.springframework.web.bind.annotation.GetMapping;
import org.springframework.web.bind.annotation.PathVariable;
import org.springframework.web.bind.annotation.PostMapping;
import org.springframework.web.bind.annotation.PutMapping;
import org.springframework.web.bind.annotation.RequestBody;
import org.springframework.web.bind.annotation.RestController;

import com.doj.restapi.bean.Account;
import com.doj.restapi.bean.AccountList;
import com.doj.restapi.service.IAccountService;

/**
 * @author Dinesh.Rajput
 *
 */
@RestController
public class AccountController {

 @Autowired
 IAccountService accountService;

 @GetMapping("/")
 public String home (){
  return "Spring REST Dinesh on Java!!!";
 }

 @GetMapping("/accounts")
 public AccountList all (){
  return accountService.list();
 }

 @PostMapping("/account")
 public Account create (@RequestBody Account account){
  return accountService.create(account);
 }

 @GetMapping("/account/{accountId}")
 public Account get (@PathVariable Long accountId){
  return accountService.get(accountId);
 }

 @PutMapping("/account")
 public Account update (@RequestBody Account account){
  return accountService.update(account);
 }

 @DeleteMapping("/account/{accountId}")
 public void delete (@PathVariable Long accountId){
  accountService.delete(accountId);
 }
}
In this controller class we have used @RestController annotation. Till Spring 3, we would have been using @Controller annotation and in that case it was important to use @ResponseBody annotation as well as below:
@Controller
public class AccountController {
.....
.....

@RequestMapping("/account/{accountId}")
public  @ResponseBody Account get (@PathVariable Long accountId){
  return accountService.get(accountId);
}
.....
.....
}
As of spring 4.0, we can use @RestController which is combination of @Controller and @ResponseBody. Read my article RestController in Spring Framework 4.0 for more detail.
@RestController = @Controller + @ResponseBody
In this example, we are using @GetMapping, @PostMapping, @PutMapping and @DeleteMapping annotations, these annotations are introduced from Spring 4.3 version in parallel of @RequestMapping with Http Methods annotation as below.
@GetMapping = @RequestMapping + Http GET method
@PostMapping = @RequestMapping + Http POST method
@PutMapping = @RequestMapping + Http PUT method
@DeleteMapping = @RequestMapping + Http DELETE method
Spring provides HttpMessageConverters to convert an object to the xml representation requested by the user. Spring’s @ResponseBody annotation is responsible for generating body response by using result of the method to the client. In this example we want XML response so this marshaling is done by the Jaxb2RootElementHttpMessageConverter provided by Spring which is automatically registered in spring context if JAXB libraries are found in classpath. JAXB library is inbuilt in the java from JDK 7.0 here I am using JDK 8 in this application, so there is no need to configure JAXB library into Maven dependency file.
b) JAXB Annotated Model Objects
We need to annotate bean class with @XmlRootElement and @XmlElement to support for xml.
Account.java
/**
 *
 */
package com.doj.restapi.bean;

import java.io.Serializable;

import javax.persistence.Entity;
import javax.persistence.GeneratedValue;
import javax.persistence.Id;
import javax.persistence.Table;
import javax.xml.bind.annotation.XmlAccessType;
import javax.xml.bind.annotation.XmlAccessorType;
import javax.xml.bind.annotation.XmlAttribute;
import javax.xml.bind.annotation.XmlElement;
import javax.xml.bind.annotation.XmlRootElement;

/**
 * @author Dinesh.Rajput
 *
 */
@XmlRootElement
@XmlAccessorType(XmlAccessType.NONE)
@Entity
@Table
public class Account implements Serializable{

 /**
  *
  */
 private static final long serialVersionUID = 1L;

 @XmlAttribute
 @Id
 @GeneratedValue
 public Long accountId;

 @XmlElement
 public String name;

 @XmlElement
 public String city;

 @XmlElement
 public Double balance;

 public Account() {
  super();
 }
 public Account(String name, String city, Double balance) {
  super();
  this.name = name;
  this.city = city;
  this.balance = balance;
 }
 public Long getAccountId() {
  return accountId;
 }
 public void setAccountId(Long accountId) {
  this.accountId = accountId;
 }
 public String getName() {
  return name;
 }
 public void setName(String name) {
  this.name = name;
 }
 public String getCity() {
  return city;
 }
 public void setCity(String city) {
  this.city = city;
 }
 public Double getBalance() {
  return balance;
 }
 public void setBalance(Double balance) {
  this.balance = balance;
 }
 @Override
 public String toString() {
  return "Account [accountId=" + accountId + ", name=" + name + ", city=" + city + ", balance=" + balance + "]";
 }

}
AccountList.java
/**
 *
 */
package com.doj.restapi.bean;

import java.io.Serializable;
import java.util.List;

import javax.xml.bind.annotation.XmlElement;
import javax.xml.bind.annotation.XmlRootElement;

/**
 * @author Dinesh.Rajput
 *
 */
@XmlRootElement (name="accounts")
public class AccountList implements Serializable {

 /**
  *
  */
 private static final long serialVersionUID = 1L;

 private List<Account> listOfAccounts;

 public List<Account> getListOfAccounts() {
  return listOfAccounts;
 }
 @XmlElement(name = "account")
 public void setListOfAccounts(List<Account> listOfAccounts) {
  this.listOfAccounts = listOfAccounts;
 }

}
c) Create a Service class AccountService.java
This class has CRUD method service for account resource.
AccountService.java
/**
 *
 */
package com.doj.restapi.service;

import java.util.ArrayList;
import java.util.List;

import org.springframework.beans.factory.annotation.Autowired;
import org.springframework.stereotype.Service;

import com.doj.restapi.bean.Account;
import com.doj.restapi.bean.AccountList;
import com.doj.restapi.repository.AccountRepository;

/**
 * @author Dinesh.Rajput
 *
 */
@Service
public class AccountService implements IAccountService{

 @Autowired
 AccountRepository accountRepository;

 @Override
 public Account create(Account account) {
  return accountRepository.save(account);
 }

 @Override
 public Account get(Long accountId) {
  return accountRepository.findOne(accountId);
 }

 @Override
 public Account update(Account account) {
  return accountRepository.save(account);
 }

 @Override
 public void delete(Long accountId) {
  accountRepository.delete(accountId);
 }

 @Override
 public AccountList list() {
  AccountList accountList = new AccountList();
  Iterable<Account> itr = accountRepository.findAll();
  List<Account> accounts = new ArrayList<Account>();
  for(Account account : itr){
   accounts.add(account);
  }
  accountList.setListOfAccounts(accounts);
  return accountList;
 }
}
d) Create a Repository class AccountRepository.java
This is an interface which extends an interface of Spring Data JPA for using CRUD operation over account class.
/**
 *
 */
package com.doj.restapi.repository;

import org.springframework.data.repository.CrudRepository;

import com.doj.restapi.bean.Account;

/**
 * @author Dinesh.Rajput
 *
 */
public interface AccountRepository extends CrudRepository {

}
Step 6: Deploying this application to tomcat server
Right click on project -> run as -> run on server
After starting of tomcat server, Let’s check our application with Rest client Postman, it is UI based client for testing restful web applications, postman is chrome plugin. Launch postman.
a) POST method: CREATE Account Resource using POST http method
Post method is used to create new resource. Here we are adding new Account to the account database, so you can see we have used account XML in post body.

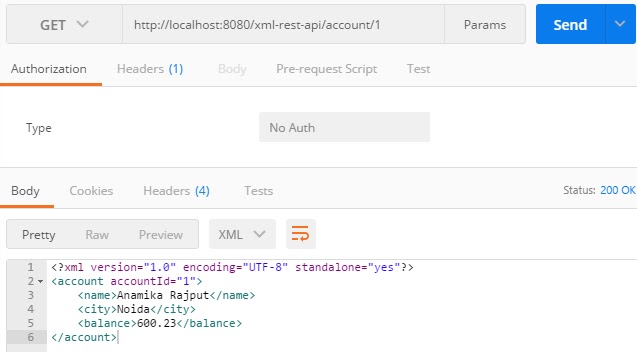
b) GET method: READ Account Resource using GET http method
Test our get method Spring REST service. You will get following output as below:
c) PUT method: UPDATE Account Resource using PUT http method
Put method is used to update resource. Here we will update name of account holder of accountId=1 using put method. So we will update account XML in body of request of accountId is 1 as below.

d) Read All Account Resources using GET http method

e) DELETE method: DELETE Account Resource using DELETE http method
Delete method is used to delete resource. So here we will pass accountId of account which needs to be deleted as Path Param. We are going delete the account who have accountId=1.

f) Read All Accounts after DELETE Call

- Spring MVC Web Tutorial
- Spring MVC Interview Questions
- MVC Design Pattern
- Spring MVC DispatcherServlet
- Spring MVC WebApplicationContext and Root Application Context
- Spring MVC @Controller Annotation
- Spring MVC @RequestMapping Annotation
- Spring MVC @RequestParam Annotation
- Spring MVC ContextLoaderListener
- Spring MVC @RequestParam and @PathVariable annotations
- Spring MVC Hello World Example
- Spring MVC Exception Handling Example
- Spring MVC with Hibernate CRUD Example
- Spring MVC Tiles Plugin with Example
- Spring MVC Interceptor with example
- Spring MVC with MongoDB CRUD Example
- Spring MVC Internationalization & Localization with Example


Hi, Could you attach source code with jars for downloading this tutorials?
Thanks